Polycom VVX IP Phones – Manual Configuration
Polycom VVX IP Phones – Manual Configuration
Customize the following features on your Polycom VVX handsets.
- Manually Configuration
- Changing the Handset label
- Extension dialling
- Handset Volume
- Upgrading Firmware
- Presence and BLF (Busy Lamp field)
- VVX Bluetooth headsets
- Voicemail
1. Manual configuration
This knowledge base applies for subscribers not using our automated device provisioning.
- Retrieve the handset IP address: Home (Button) > Settings > 4. Status > 2. Network > 1. TPC/IP
- Web UI: Enter IP address (eg 192.168.1.11) into browser
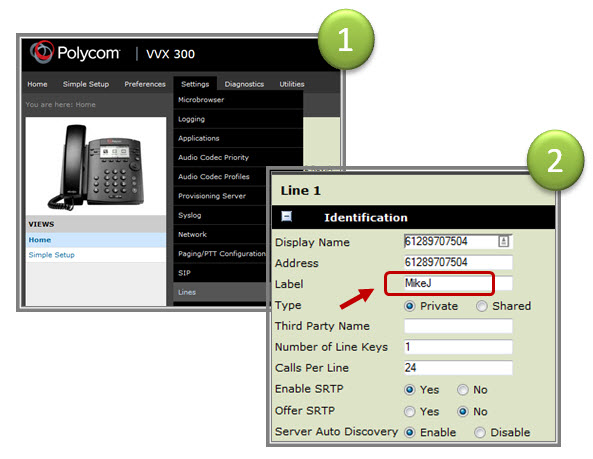
- Settings > Lines (select Line)
Follow instructions in Fig below
- SIP Protocol: Enable
- Identification:
- Display Name: Your Name
- Address: Your Phone Number (e.g. 092420000)
- Label: Your Name
- Authentication:
- Login Credentials: Disabled
- User ID: Your Phone Number (e.g. 092420000)
- Password: Your Password
- SIP Server 1
- Address: sip.techconnections.co.nz
- Transport: TLS (Preferred)
- Expires: 300
- Register: Yes

2. Changing the Handset label
By default the our provisioning system sets the Display Name, Address and phone Label with the default phone number. You can change the phone label to an Alpha name e.g. Mike, which is handy particularly for phones configured with multiple lines.
- Retrieve the handset IP address: Home (Button) > Settings > 4. Status > 2. Network > 1. TCP/IP
- Web UI: Enter IP address (eg 192.168.1.11) into browser
- Settings > Lines (select Line)
- Identification: change Label (see Fig 1 below)
3. Extension dialling
Set your preferred a line extension (eg reduce 092420000 to 890) allowing coworkers to call you using your preferred three or four digit number.
4. Handset Volume
You may have noticed that the Polycom handset volume is a little low. But secondly, while you can increase volume using the handset volume button, each time you pick up the phone for another call it annoyingly resets to the factory default. The problem is US telecommunications regs require all US vendors to reset handset volumes to the defaults at the end of each call.
If using you are using our Polycom provisioning we have disabled the reset function to persist your handset volume.

5. Upgrading Firmware
While all Polycom VVX phones supplied by SIPcity ship with the latest firmware, new phones purchased through other channels will probably require a firmware upgrade.
If you wish to leverage our Polycom provisioning system with legacy IP phones (firmware 3.3.xx or older) you will first need to upgrade the phones firmware as the older Polycoms don’t support web based auto-provisioning. Secondly, depending on model, you may have to complete a two step firmware upgrade to achieve the minimum 4.1.1 software supporting our web based auto-provisioning.
- Log into the phones web browser
- Standard Password: 456
- Utilities | Software Upgrade
- Check for Updates
- Select latest update from selection list
- Install
6. Presence and BLF (Busy Lamp field)
- Log into Customer CloudPBX
- Select Cloud PBX > Advanced > Presence BLF –> Enable
- Click Save to update your settings
6.1 Enable BLF on the handset (phone)
- Get phones IP address: Settings > 4. Status > 2. Network > 1. TCP / IP…
- Enter IP address into Browser
- Log onto phone (UserName and Password)
- Preferences > Presence >> Enable
6.2 Enable Buddy on handset
- Settings > Directories > Contacts Directory > 1. Add (+)
- First Name, Last Name (optional), Contact (requires full number including country / area code)
- Protocol –> SIP (only for VVX500, 600)
- Watch Buddy –> Enable
- SAVE
- Select contact —> Add to favorites (if you want the contact to appear on the home screen of your keypad).
7. VVX Bluetooth headsets
Within the Polycom VVX family only the VVX 600 natively supports Bluetooth.
- Enable Bluetooth: Menu > Settings > 2. Advanced (PW 456) > 1. Administrative Settings > 7. Handsfree Settings > 1. Handsfree Mode >> select Enable
- Enable Radio: Menu > Settings > 1. Basic Settings > 11. Bluetooth Settings >> Enable Radio ON
- Headset: Place your headset in in pairing.
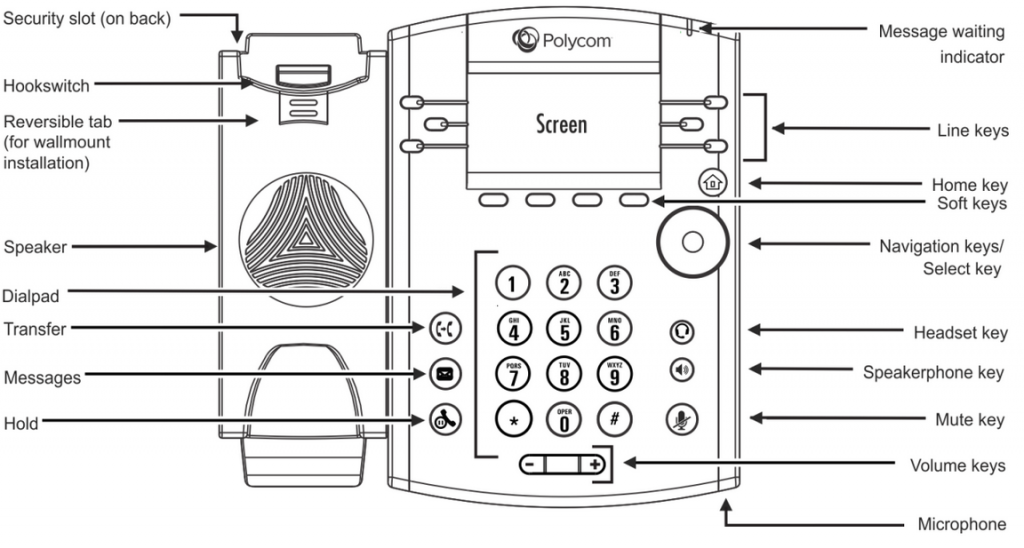
- To Pair: Press the Bluetooth symbol (see screenshot below) to take you back to Bluetooth Settings.
- Select Manage BT Headset – Select Scan then select the required headset.
8. Accessing Voicemail from a Polycom handset
If you have a CloudPBX provisioned Polycom handset Voicemails can be retrieved by selecting the “Messages” button on your handset.
- Select Messages key
- Select 1 “New Messages” THEN
- 4 – previous message
- 5 – Repeat
- 6 – Play next message
- 7 – Delete
- 8 – Forward
- 9 – SAVE
On the VVX300 Messages is a physical button adjacent the 7 key.
On the VVX500/600 you will find messages as a soft key in the top left of your screen.
Related Articles
Yealink W52P DECT VoIP Phones - Manual Configuration
Quick Guide Step 1: Base Station The W52P base station can be powered by the supplied 120/240v adaptor or alternately from a POE switch. Install the 2 x AAA rechargeable batteries into the handset (and recharge if required). Enter the IP address in ...Gigaset Cordless IP Phones - Manual Configuration
Configuring the phone via the Web configurator We recommend using the base stations web user interface to configure each handset. Establish the telephone’s current IP address on the handset Control button on right side of handset Settings (spanner ...Asterisk Configuration Guide
Asterisk is a very popular open source PBX which will work well with our platforms. Other variants/forks of Asterisk include FreePBX, Trixbox and Callweaver. You can connect to our service using either the SIP or IAX2 protocol. The way you configure ...Mikrotik Router Configuration
Mikrotik routers are recommended for use with Tech Connections's Broadband service and they are very simple to setup. Tech Connections do NOT use PPP for connections to our network. You simply need to enable DHCP on the WAN interface and use VLAN 10 ...Asterisk Based PBX Systems (including FreePBX, Trixbox, Elastix and other variants)
Tech Connections Internet are passionate about Asterisk, Freeswitch and other open source initiatives. So much so that we use open source products throughout our own network. By embracing open source initiatives we believe this gives us a unique ...